Home Tour

Welcome to our home!  I always enjoy looking at the first pictures I took of our home, before it was actually ours, and the current pictures.  It’s a great reminder of the changes and personal touches we’ve put on our home.

Entry 

Powder Room

Mudroom

Kitchen

Family Room

Dining Room

Living Room

Guest Bathroom

Office

Guest Bedroom 1

Guest Bedroom 2

Master Bedroom

Stay tuned for the basement before and after


Mudroom Before & After

Finally!  Our mudroom is almost 100% complete.  I still have some little decorative details to add, but it’s 100% functional at this point.  Just in time for our first snow of the season.

When we looked at our house the mudroom looked like this:

mudrrom before 1

My first project after we moved in was to update this space to something a little more appealing when we first walk in the door.

mudroom before 2

I also added a mirror above, and eventually the cute chair moved out and Max’s dog food station took it’s place.  In daily life, this room holds the dog leashes, Max’s food station, our mail, keys, and anything else that we dump when we walk in the door from the garage. It’s our catch all room.

I knew we needed to update the space to something more functional for our needs.  Our hall coat closet is pretty small, and it also acts as our vacuum storage closet, so I wanted to be able to hang our coats, bags, and keys when we first walk in the door.  But, I also didn’t want to see all the clutter when you walk down the hallway to the kitchen.

I drew up my ideas and handed them over to my every trusty handyman, Jim, and he started the construction.

mudroom

He brought the pieces over as they were completed, and I primed and then painted them Urban Bronze.

mudrrom paint

I painted the inside of the cabinets white and installed temporary contact paper inside the doors.  Once installed, we added hooks for our coats, bags, and keys.

I also added contact paper at the bottom of the upper open shelf so the boxes would slide easier when we need to grab our hats, gloves, and scarves.

It was a work in progress for a bit while all the pieces and parts were constructed and installed, but that didn’t stop Max from enjoying his new dining digs.

mudroom during i

I had the lower shelf installed to act as Max’s food station, and the upper shelf was installed a bit higher than counter height to give him some space while he eats.

mudroom during

We are pretty sure he likes his new space.

mudroom after max

It’s such a small space, that it’s difficult to get decent pictures, but here is the finished mudroom.

mudroom after i

And a view from the hallway.

mudroom hallway

We are loving our new space! Thanks for checking it out.

Sharing on:

Thrifty Decor Chick

The Refinished Coffee Table

I found this beauty on a local garage sale Facebook page, and knew that the size and shape would be perfect for our Living Room.  And, at $10, I couldn’t pass her up.

coffee table before

Her orangey color didn’t complement the rest of our decor, but I put off refinishing her for a long time because of past experiences trying to stain furniture.  I have read a lot about gel stains, and decided to give it a try.  I figured if it didn’t turn out, I could always sand her back down and paint her.

I purchased 1/2 pint of General Finishes Gel Stain in Java from a local shop, and then I started one of my least favorite tasks – sanding.

I started out with a 120-grit sanding block, but ended up busting out my 60-grit block to really get the shine off the coffee table.  I think I should have been smarter and purchased a sander, but I persisted with my sanding block.  Unfortunately, because it was such a rough grit, it did leave some deep lines in the wood, but I was just too impatient to do it the right way.  Live and learn.

Once the coffee table was sanded down, I started to stain.  The woman the shop told me to stir it very carefully and fully, making sure to scrap the bottom of the can and mix the top and bottom layers of stain.

coffee table stain 2

I used a clean, lint free cloth to apply the stain and let the first coat dry for 24 hours before applying the second coat.  You can see the sanding lines and uneven application after the first coat, but I already liked the Java color.

I applied 3 coats of stain, letting each dry for 24 hours before the next coat, and then a coat of Minwax fast drying polyurethane (because I’m impatient).  I let the fast drying poly dry for 48 hours before bringing the table inside.

coffee table after

It’s not perfect, but I’m happy with the finished result.  I would definitely use gel stain again!

The Painted Sofa

Way, way back around 1989, my family moved across town to a larger home with a bigger yard.  We suddenly found ourselves in need of a new sofa for the front room, and after a lot of searching, my mom purchased a stylish mint green and peach Flexsteel sofa.  It was quite lovely…back in 1989.

For years, that sofa sat in my parents front room, the formal room.  The room that is for looks.  It lived in 3 different houses, two on the west coast and one on the east coast.  But, during that entire time, from 1989 to 2017, the sofa was probably sat on for a grand total of 2 hours and 20 minutes by 6 individuals.  Last year, my mom called to ask if I wanted the mint green and peach sofa.  And, I told her I wanted it (it was in great shape), but that I was going to paint it.  I’m sure she thought I was a bit odd, but she and my dad brought it up with them during their next visit.

Years ago, when I first started browsing around blog land, I stumbled on a post about painting sofas.  It seemed a bit strange, but then I found another post about painting sofas.  And, it stuck in my mind.  There are a lot of reviews and advice about painting sofas, some are pro-painted sofa and others are con-painted sofa, but I figured I wouldn’t know until I tried.

And I’m glad I did.

I followed Kristi’s process on Addicted 2 Decorating.  It’s a super easy, slightly time-consuming process, but I’m happy with the results.  And, more important, Tripp was surprisingly pleased as well.

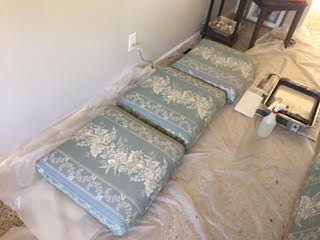
I didn’t take before pictures of the sofa in it’s natural state, but the below pictures give you an idea of this 80’s beauty.

SHL Sofa Before

SHL Sofa Before Cushions

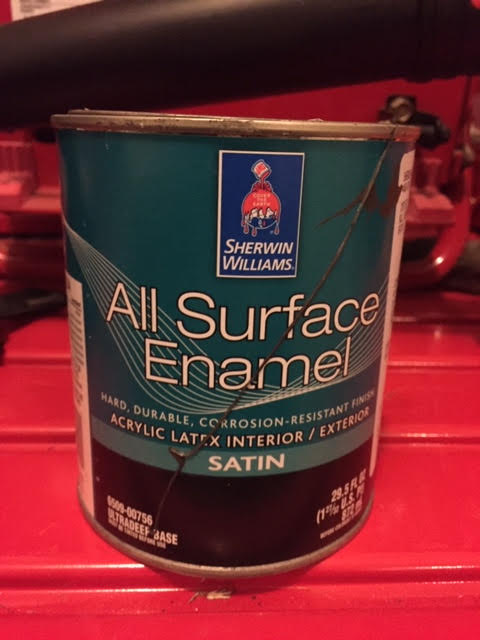
I used Martha Stewart Fabric Medium.  If memory serves correct (it’s been a few months since I completed this project), I purchased 8 bottles for the project and returned 2 at the end.  I used a 1:1 ratio of latex paint to fabric medium, and a spray bottle of water to dampen the fabric for the first coat.  I used a 2-inch brush to get around the trim and into the corners.  And, after the first coat, it looked a bit rough, which every blogger warns will happen.


I waited a few hours for the first coat to dry, and then continued with coats 2, 3, and 4.  By the third coat, it was looking good, and even Tripp was starting to breath a sigh of relief.  But it still needed that final coat.  I left it dry 24 hours before putting the cushions back.  And, then we waiting another 24 hours before we sat on it.


It’s pretty comfie, for a painted sofa.  It doesn’t feel or look like fabric or leather, but it isn’t sticky or slimy.  It’s a unique texture, and the original texture of the fabric pattern shows through a bit.  At Christmas, our guests sat comfortably on it, and sometimes Tripp naps on it.  It’s in our front room, which is rarely used, and at some point we’ll likely reupholster it.  But, for now, it works well for us.

SHL Sofa After V

SHL Sofa After VI

Hope you enjoy!

This post has been shared on:

A Stroll Thru Life

Kitchen Refresh Budget

Well hello!

It’s been a while since I’ve blogged, and I realize that I need to provide the budget for our kitchen refresh.

Obviously, we would have saved more if we had done the work ourselves, but between our full-time jobs and our lack sophisticated DIY experience, we felt it was best to hire a handyman to get the job done.

Below are the estimated costs for materials and labor for our refresh:

Floor Tile ~ $700

Floor Installation & Pantry/Refrigerator Shift – $2,500

Back Splash Tile ~ $450

Back Splash Installation – $300

Formica Countertop and Installation – $1,400

Island Pendant Light – $99

Sink/Faucet – $250

Whirlpool Oven – $1,110 (we got ours on sale!)

Whirlpool Microwave – $290

Whirlpool Dishwasher –  $350

Total – $7.449


Thanks for stopping by!

Our Finished Kitchen!

Finally!

After months of renovating, our kitchen is finally complete.  And, we are thrilled with the results.  The makeover was definitely worth it!

SHL KITCHEN AFTER X

A few before shots as a reminder of how far we’ve come…

The new view when you walk in to the kitchen

SHL Kitchen After III

And, the previous view…

The new wood-tile floors make the whole room feel more cozy.  By moving the the pantry and refrigerator over a few feet, we created more space to extend the countertops and create a seating area at the island.

SHL Kitchen After VII

Now, we have a bigger pantry, a “built-in” refrigerator, and a mini-bar (the main bar is now in the man cave).  And, room for bar stools at the island.

SHL Kitchen After IX

Our new Formica countertops are low-maintenance, affordable, and complement the new look of the kitchen. And, I love our new backsplash!

SHL Kitchen After XII

We didn’t spend a fortune on this makeover, but it feels like we did!  I’ll share our overall budget soon!

Thanks for stopping by!


Linked up on:

Choosing Flooring – Wood v. Tile

Our decision to move forward with our kitchen was strongly based on our intense dislike of the original vinyl floor.

SHL Kitchen After 4

20 year old vinyl flooring

As much as we knew the floor needed to be replaced, we disagreed about whether to go with wood or tile.  I love the classic, beautiful look of wood, but Tripp liked the practicality and function of tile.  He worried about wood floors in the kitchen and the potential of damage due to the greater likelihood of leaks.  After so many years on St. Thomas, with boring beige 12″x12″ tile floors, I knew I couldn’t go back to traditional tile.  So, we were at a standstill.  I considered wood-grain tile, but I wasn’t impressed with the tiles that I saw.

Until I found a great real wood looking tile at Lowe’s…and it was on clearance!  It has a nice wood-grain look and texture, and the tiles are long planks (48-inches long and 7 inches wide).

I bought a box that day and brought it home with a few wood samples to show Tripp.  He immediately preferred the look of the tile piece, although he initially thought it was wood.

And the hunt was on for clearance tile.  Our local store only had 10 boxes, and we needed ~36 boxes.  So, we drove to 5 different stores within an hour of our home to score a great deal.


Yes – $1.99 square foot versus the original $3.98 square foot!  We even found one Lowe’s store that was selling it for $1.69 square foot, so we bought them out of all 20 boxes they had in stock.  The only downside is that Lowe’s is no longer selling this exact tile; however, they do have a few similar options.


We had the tile laid throughout the entryway, front closet, powder room, mudroom, hall, and kitchen.  I calculated that we we need about 36 boxes of tile, so we purchased 43 boxes to be on the safe side and allow for breakage.  In the end, we had 7 boxes left over (meaning my original calculation was dead on!) and we returned the extra boxes.

I would love to boast that we laid the tile ourselves, but we are just not that talented, handy, or patient.  Our wonderful handman, Jim, is responsible for all the hard work.  And, he did an absolutely wonderful job!


SHL Tile Redo V

Max loves the coolness of tile floor.

It took a lot of time, but we are in love with our new floors.  They are durable, dog-friendly, and gorgeous!  We have receive so many compliments, and most people don’t realize it’s tile until we tell them.


I think it’s quite an improvement over the original vinyl flooring.

SHL Floor After

Stay tuned for more of our kitchen update!

This post has been shared on:

Life on Lakeshore Drive

Missing Christmas

SHL Baxter Christmas

Poor Baxter is not ready to pack up his Christmas spirit yet.  But, it’s time.  All those needles on the tree skirt are pointing to the end of the holiday season.  So, this weekend we will pack up the ornaments, the stockings, the lights, the garland, etc., and Tripp will start his countdown until next Christmas.

Budget Kitchen Update – Part I

We are nearing the final stretch of our kitchen update, and I am thrilled with the results.  It’s been quite the adventure – over the last several months we have our handyman has reworked our pantry and refrigerator wall, installed beautiful wood-grained tile floor, updated the finish on the kitchen island, and installed new counter tops.  Our final touch will be installing a new back splash.


shl-kitchen-4

The original pantry wall

SHL Kitchen After 2

The updated pantry wall

The pantry was awkwardly designed, with the side of the refrigerator being the first thing you encounter then you walk in the kitchen.  I wanted to enclose the refrigerator, pull the pantry out a few inches to be flush with the refrigerator, and push the bar area back to enable us to extend the kitchen island counter top.

Jim, our handyman, started by ripping out the old pantry.  He had to move the refrigerator outlet, the water line for the ice maker, and he added a recessed light to our new pantry (such a luxury).

SHL Kitchen Pantry Redo

The ripped out pantry wall

He then framed and drywalled the new pantry, which is about 4 inches wider and 6 inches deeper than the previous pantry.  That doesn’t seem like a lot more space, but it really feels like it to me.

SHL Kitchen Pantry Redo I

The new pantry location

SHL Kitchen Pantry Redo II

Max approves of the new space

We used the previous cabinet above the refrigerator and framed in the refrigerator.

SHL Kitchen Pantry Redo III

The new design is shaping up.

SHL Kitchen Pantry Redo IV

I am thrilled that the side of the refrigerator is hidden

At one point we discussed having new cabinets made to match our current cabinets, but the current design is more budget friendly.  We opted to go with a bi-fold door for the new pantry, and we are really happy with the result.

SHL Kitchen Pantry Redo VI

Done!

We are still determining how we want the bar to be structured, so for now we are using a linen cabinet from Target.  It’s working well so far, but will not be our final piece.

SHL Kitchen Pantry Redo V

Much better!

I hope you like the improvements as much as we do!  Stay tuned to see our new floors!

~~~~~

Shared on:

{nifty button}


Tears in America’s Paradise

SHL Island

In 2008, I met my husband, Tripp, while visiting a friend who lived on St. Thomas in the US Virgin Islands.  The short story is, we fell in love, and I moved to the island a few months after meeting him.  At the time, it made sense.  I loved my life in Orange County, CA, but I was willing and ready for a change.  In hindsight, it was insane.  I left a good job, fantastic girlfriends, and a condo that I loved (and had finally nearly finished updating and decorating).  But, it was definitely an adventure, and it has become an important part of our story.

Tripp and I spent the first 7 years of life together on St. Thomas, a 32-square mile island in the Caribbean.  St. Thomas, St. John, St. Croix, Water Island, and a number of smaller cays, make up the US Virgin Islands.  These islands, surrounded by turquoise blue water, are known as “America’s Paradise”.  It even says so on the license plate.  They are a major cruise ship and tourist destination.  As a US territory, Virgin Islanders, just like their commonwealth neighbors in Puerto Rico, are US citizens.  Americans.

On September 6, 2017, St. Thomas was hit by Hurricane Irma, a category 5 hurricane that had already demolished Barbuda, St. Martin, and Anguilla.  Irma tore roofs off homes, uprooted trees, tore the siding off buildings, destroyed roads, condemned the hospital, and left many people without safe water, food, and shelter.  St. John and the British Virgin Islands were also leveled by Irma.  Then, two weeks later, Hurricane Maria, another category 5 hurricane, destroyed Dominica, St. Croix, and Puerto Rico while causing additional damage and flooding to the islands already devastated by Hurricane Irma.

The situation in the USVI, Puerto Rico, and the BVI is dire.  So many people, including over 3 million Americans, are without water, food, and shelter.  Relief efforts have begun, and there are stories of amazing people doing amazing things.  Organizations like Island Dog Rescue, that sent a large plane to fly all the dogs and cats from the St. John, St. Thomas, and St. Croix animal shelters to Virginia Beach, VA, where they were delivered to the safety of local animal rescues (how awesome are they?).  Tim Duncan, a St. Croix native, has been actively involved in collecting and distributing donations.  Congresswoman Stacy Plaskett was instrumental in setting up Fund for the Virgin Islands through the Community Foundation of the Virgin Islands.  The islands are in desperate need of any help you can provide, whether monetary or supplies.

Want to help? 

USVI Recovery 

Island Dog Rescue 

Adopt a Family in the USVI

There are just a few ideas for donations.  Check your local community for ways that you can help as well.  Thank you!

jost